MosaicSmith Blog

Showing posts with label concrete. Show all posts

Thursday, April 24, 2014

How to Make Carved Concrete Stepping Stones


Here in Florida, we are a couple months into Spring and that means I have a Spring project. A rather large one this year!!
I am creating a poured concrete stepping stone path in my front yard (Yes, basically I am making a mosaic with stepping stones, ha!  :).  It will be about 80 feet long when complete.
FYI: Basic How-to for stepping stones (here on my blog).

I have about half of it set, leveled and planted with dwarf mono grass plugs and Blue-eyed grass (which is actually not a grass but is in the lily family).  And I have about another quarter of the stones poured.

That bare area will get sod.

But, of course, I HAD to get a little creative!

I am using a variety of molds for these stones, only one of which is sold as a stepping stone mold (and is not pictured).

I found a plastic container with nice crisp corners and plain bottoms (intended to be used for holiday treats), and I also found a set of tiered cake tins I had picked up at a thrift store years ago.
Foil containers work too but result in rough sides plus can only be re-used a few times each.


The largest mold is the plastic saucer for a very large outdoor pot. You can see it towards the top of the photo above.


And, this ===> is what a simple poured concrete stone looks like using the pot saucer as a mold:

Blah!!


So I did a bit of research, gathered a few basic tools to carve and make marks, and got busy!

* The main carving tool I am using is the red handled X-acto with a saw blade. You can use any sort of saw you have handy, even an old kitchen steak knife.
* The old green-handles garden sheers make nice lines and gouges.
* The old dental tool makes nice lines and also smooths areas.
* That odd bit of copper pipe wrapped in a paper towel? That makes great little circles (bottom left of photo). And if pressed in and rotated well, will even pop out a bit of concrete to make a large circle depression. Nice for flower centers (second row, far left :)

I am trying to make each carved stone different.

One of these is not like the others.
Can you spot it??

TIPS:
*See my blog post on: "How to make a poured concrete stepping stone."

*Place a board or large floor tile on top of your mold before flipping. Then, after carving, move the board/tile together with the stone. Don't want to crack that soft stone while moving it!!

*Timing for carving is critical, and dependent on your own conditions: air temperature, how wet your mix was... I find it is ready to carve once the poured surface has started to loose the wet gloss and is hard to the touch. For me, this is around 8 hours at my current (warm) temperatures. There is a time window for carving, but remember, the more time after pour, the harder it will be to carve. I did a few after about 16 hours and it was rather wrist-aching!


*Lightly score your lines first, then proceed with deeper carving. Try to cut away from the areas you want to keep.

*Periodically brush off loosened concrete so you can accurately see the emerging design. I use a dust pan/brush set.


Interested to see what else I've done with stepping stones? Click here to go to all posts tagged with 'stepping stone'.
All designs are my own. If you make some stones I hope you use the opportunity to also create your own designs. Have fun!


I don't just play with concrete!! 

I create original design silver jewelry too!! 
https://www.mosaicsmith.com/collections/all   or
https://mosaicsmith.etsy.com

Tuesday, June 21, 2011

Third Set of Nine Mosaic and Poured Concrete Stepping Stones


I have completed nine more poured concrete and glass stepping stones for my yard.

This is a very ongoing task with the goal of creating about 50 to aid in walking around our side and back areas where we have river rock in place of grass.

Click image to enlarge.

The top left lighthouse (St Augustine, FL) is pieced out of glow-in-the dark tile sections for light. The bottom middle is showing the rainbow of six smaller poured concrete bubbles from the tropical fish. Many of these designs are inspired by Florida nature. The right middle is brain coral and that rooster was one we saw living in Key West.


Interested in making some stones yourself?
I did a blog posting a while back with detailed how-to instructions, plus pictures, for making these poured concrete stepping stones- click here to see.

All designs are my own. If you make some stones I hope you use the opportunity to also create your own designs.

I don't just play with concrete!! 

I create original design silver jewelry too!! 
https://www.mosaicsmith.com/collections/all   or
https://mosaicsmith.etsy.com


Friday, January 28, 2011

How To Make Concrete Mosaic Garden Art Ball

You can make very fun garden art using found objects and scrap glass.

This post details how I made the garden ball pictured above, using a glass globe from an old pendant light fixture. You likely don't have one of those handy :) , but a little thinking outside the box and you can come up with other unique 'molds' to make bases for your own personalized garden art.

First- some general supplies:
  • Some sort of 'mold'. Ideas- glass bottles, plastic containers such as milk bottles, takeout food containers... IMPORTANT: If you use a plastic form, you must have an opening wide enough for the cured concrete to be removed through. For milk jugs, cut off the entire top before adding concrete mix. The opening needs to be as wide as the widest part of your shape.
  • concrete mix
  • eye protection!, hammer, prying tools
  • glass nippers
  • scrap stained glass- often local stained glass shops will sell scrap by the pound or ebay and etsy both often will have listings for scrap.
  • thin set mortar
  • grout
Before adding concrete mix, I lightly coated the inside of the shape with a mold release- Vaseline but cooking spray will work in a pinch.

Add concrete mix slowly and tap occasionally (with your hand!) to raise air pockets. Don't want to break that glass yet! If your shape includes thinner sections, you will want to reinforce them with hardware cloth sections embedded in the center. See my stepping stone instructions.

If you use a plastic form, you can unmold, carefully, usually after one day.

If you use glass, WAIT a minimum of 10 days for the concrete to cure before breaking glass. Full cure is at 30 days.


Be sure to wear eye protection when breaking the glass off! I used both the hammer and the knob end of a glass scorer to break the glass in sections. Old dental tools and flat blade screwdrivers worked well to pry off sections.

Now that you have your blank concrete 'canvas', have fun creating!! I used the glass I removed to make the white flowers on my garden ball. They were especially pleasing to work with because the glass was curved and fit nicely back on the ball. I used thin set mortar to attach my glass. This is a weather friendly glue though if you live in a freeze zone, mosaic art lasts longer if brought inside in winter.

For adding flat glass to curved sections, smaller pieces fit around the curves better- and are less hazardous! Use extreme care when handling your piece as there will likely be sharp exposed points and edges. Grouting will minimize this.


I don't just play with concrete!! 

I create original design silver jewelry too!! 
https://www.mosaicsmith.com/collections/all   or
https://mosaicsmith.etsy.com

Sunday, September 20, 2009

More Poured Concrete Stepping Stones


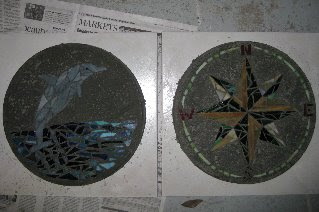
The second set of nine poured concrete and stained glass stepping stones are finally complete after I took a bit of a break due to summer. Top left jellyfish is created with bits of glow-in-the-dark tile.

Interested in making your own stepping stones??
I did a posting a while back with detailed how to instructions and pictures for making these poured concrete stepping stones- click here to see.

All designs are my own. If you make some stones I hope you use the opportunity to also create your own designs.
~~~~~~~

I don't just play with concrete!!

I create original design silver jewelry too!! 
https://www.mosaicsmith.com/collections/all   or
https://mosaicsmith.etsy.com


Wednesday, August 5, 2009

Custom Order Wedding Stepping Stone


Ack
, falling behind a bit on the blogging what with kids off for summer vacation.

I teased about this stepping stone way back in June but never showed the finished stone. So here it is finally. Wedding colors are celadon green and chocolate brown.
Pieced in reverse with stained glass. I then used this method to make it into a poured concrete stepping stone. A bit of the detail- bee has iridescent glass for wings and the black body stripes have tiny gold flecks in them to pick up the light too.
~~~~~~~

I don't just play with concrete!! 


See my Etsy MosaicSmith shop for available mosaic art:

https://www.etsy.com/shop/MosaicSmith?search_query=mosaic+art 


I create original design silver jewelry too!!

http://MosaicSmith.com

Tuesday, May 19, 2009

First Nine Poured Concrete Stepping Stones

Here are the first nine poured concrete stepping stones in my very ongoing project to make pathways around our yard. But, yay!, I am keeping all these, lol.


Wondering how to make stepping stones like this for your yard? I blogged about the how-to here:
http://blog.mosaicsmith.com/2009/03/how-to-make-poured-concrete-stepping.html 

All designs are my own. If you make some stones I hope you use the opportunity to also create your own designs.
~~~~~~~

I don't just play with concrete, I make original design silver jewelry too!! 

https://mosaicsmith.etsy.com

 https://www.MosaicSmith.com


Sunday, March 22, 2009

How to Make a Poured Concrete Stepping Stone

Half of our yard is covered in river rock. Not easy to walk on. I've decided the solution is MANY stepping stones- guessing about 50. I could just buy a bunch at the home center, but what fun is that?? Instead I'm making poured concrete stepping stones with a different mosaic design in each. I have a few already made and thought I'd share the process I've been using. You can make these mosaics as simple or as detailed as you desire. I'm planning on using up a whole lot of bits and veering toward the simple end.

Some supplies you'll need or just find handy:

  • Portland cement type I
  • Sand
  • Dish pan (dedicated) for mixing in
  • Some sort of trowel or small hoe as a mixing tool
  • Some sort of disposable, or never to be used again for food, cup for scooping sand and cement.
  • Clean water for mixing (or admix of some type if you live in a frost zone- read labels at your home center to find an appropriate admix).
  • Disposable dust mask. Very important to wear this while working with the dry cement!!
  • Hardware cloth
  • Wire cutters or similar for cutting hardware cloth
  • Gloves- heavy duty for use when cutting hardware cloth and vinyl disposable for when mixing concrete.
  • Mold. For this project I use a 14" diameter commercially made stepping stone form.
  • Clear contact paper
  • Some sort of tesserrae for piecing a mosaic design. I use stained glass frequently.
  • Mold release of some sort. I use petroleum jelly- cheap and easy to find.
  • Newspapers for work area
  • Plastic to cover concrete after unmolding.
  • Sturdy board larger than the mold to use when flipping the mold in step 6.

***In addition to the instructions below, please also see the comments below this post!


1. The mosaic design is pieced in reverse on the contact paper. Place the mold on the paper side and trace it then cut the shape out 1/4" inside the line so it will fit inside the mold. You can sketch out a design on the paper portion. Peel off paper, and place sticky side up on your work surface with the design underneath. Remember to reverse words/letters/numbers so they are mirror image while piecing.


2. Figure out how much sand and Portland cement you need. For this project I use recipe #3 in the book Making Concrete Garden Ornaments by Sherri Warner Hunter. One great tip, among many, from this book is to fill your mold with sand and measure the volume. This will be how much you use for the project and 1/3 of this volume is how much Portland cement you will need. Use approximately half as much water/admix as cement by volume. I have a wonderful old clear plastic pitcher with very straight sides that I have marked this ratio on for each mold size I use.


3. Smear a thin coating of petroleum jelly on the inside of the mold. Place the contact paper/pieced design into the bottom of the mold with the pieced design sticky side up. Use the wire cutters to cut a circle of hardware cloth about 2" less in diameter than your mold (one inch smaller each side).


4. Add the sand to your plastic bin. Put on your mask and measure out the Portland cement and add it to the sand. Stir in well and slowly add in water/admix in increments. Be real careful that you do not add too much liquid. I aim for a very soft cookie dough consistency. Not crumbly but never runny.


5. Go slowly adding the cement mix to your mold. You need to press the concrete into all your spaces but carefully so you do not dislodge your pieces from the contact paper. Fill the mold half way then place in the hardware cloth piece. Raise slightly and tap the mold down to the ground repeatedly to raise any air bubbles. Fill the mold the rest of the way and repeat the tapping to again remove air bubbles. Smooth the surface. Clean up plastic pan and tools OUTSIDE. Cement/concrete washed down a drain will harden in the drain!


6. The filled mold needs to sit undisturbed until the surface is firm and no indent is made when touched. I found the amount of time this takes depends very much on the air temperature. In the summer here (90's day 70's night) it required only six hours but in our current temps (70's day, 50's night) it takes 12 hours. When firm enough, gently pull mold away from sides very slightly. Place a stiff board (I use a leftover large floor tile) on the stepping stone surface and carefully flip the board and the mold. Slowly pull the mold straight up to remove. Remove the contact paper slowly. The surface can be gently cleaned using a paper towel or a piece of newspaper. ****If you have small air pockets visible and would like to fill them in, mix together a slurry of just Portland cement and water. You can then use this to fill in the divots. Work a very small area at a time!! Cover in plastic and leave undisturbed for at least three days. After seven days it will be cured enough for walking on and the color will lighten to about its final color.


Interested to see what else I've done with stepping stones? Click here to go to all posts tagged with 'stepping stone'. All designs are my own. If you make some stones I hope you use the opportunity to also create your own designs. Have fun!

~~~~~~~

I don't just play with concrete!! 


I create original design silver jewelry too!! 
https://www.mosaicsmith.com/collections/all   or
https://www.etsy.com/shop/MosaicSmith


Friday, December 26, 2008

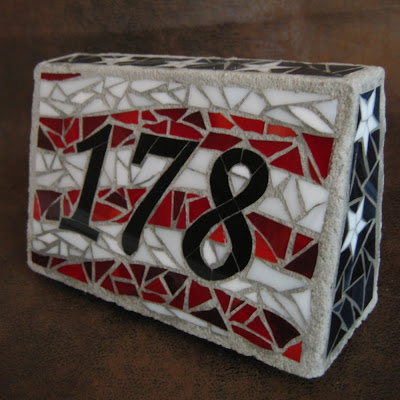
Poured Concrete House Number Mosaics

Who knew: playing with concrete is like a grown up version of playing with mud pies. Just more durable and prettier too.

First I custom designed and built the mold. It is sized so the finished house number 'brick' will fit in a flat rate mailing box. I used double ended screws and wing nuts for easy assembly/disassembly. Varnished well with spar varnish.

Then the design was pieced, in reverse, on contact paper and placed in the mold. For this one I continued the design around the edge.


A few additional designs:


-----

Usually my work is one-of-a-kind but for these I created reproducible patterns that can be used for 1-4 numbers.
~~~~~~~
Edit: November 2013 - I am not currently creating house numbers, nor doing custom work.  Too many other ideas in my head!!

Please visit my Etsy MosaicSmith shop to see what I have been creating:

Http://MosaicSmith.etsy.com 


Currently you will find a wide array of original design silver jewelry as well as mosaic art and mosaic clock. Life's a journey and I am excited to learn new skills along the way :)