MosaicSmith Blog

Showing posts with label flowers. Show all posts

Wednesday, July 13, 2016

Sterling Silver Handcrafted Flower Garden Rings - Better than a Bouquet!


Flowers...I love them! 
Flower bouquets, though lovely, make me a bit sad. They just fade too fast :/

But, with proper care, these flower garden inspired rings can last a lifetime!! 

Check my MosaicSmith website for available Flower Garden jewelry.
Search around while you are there. 
You will find I make much more than rings with flowers! Earrings, bracelets, pendants...

Wednesday, September 19, 2012

See my Fire and Rain Mosaic in Person

Edit: This show has closed. The mosaic window is now available in my Etsy MosaicSmith shop - direct link.

My "Fire and Rain" mosaic is currently on display as part of the Member's Show at the Morean Arts Center in St. Petersburg, FL.  If you happen to be in St. Petersburg before October 28th, do stop in and check out the exhibit.  Over 180 fantastic pieces of local art- many of which are for sale.


I was honored to receive an honorable mention award for this piece at the opening reception.

The gallery is at 719 Central Avenue and, behind the gallery, don't miss the Hot Shop! Some of the glass in the flower buds on the Fire side of this mosaic are broken bits from Morean hot shop glass.

"Fire and Rain" has sold.
All available mosaic art:
https://www.etsy.com/shop/MosaicSmith?search_query=mosaic+art

Sunday, July 15, 2012

Part 2 - Reversible Mixed Media Glass on Glass Mosaic

Part one of my discussion of my "Fire and Rain" glass on glass mosaic can be found here: http://blog.mosaicsmith.com/2012/07/reversible-mixed-media-glass-on-glass.html

Both sides of a reversible glass on glass mosaic titled "Fire and Rain" featuring a hibiscus flower.
Both sides of "Fire and Rain"
I should clarify- this mosaic is a bit more than a simple glass on glass project. It is really all about layers and could more properly be described as a glass sandwich where a pane of clear glass is the 'filling' and the 'bread' on each side are two unique, but related, mosaics. In addition, the focal flower on the 'fire' side is mosaiced on an additional layer of curved clear glass for the petal. (This process is the focus of Part 1, linked above.)

This post will focus on the process and design decisions for the 'rain' side mosaic.


The 'fire' side needed an upbeat mood.  Clear, vibrant, colors were chosen for that side and the leaves were oriented in a predominantly upbeat position as well. The grout lines for the sky were deliberately random but piece sizes graduated smaller going toward the horizon to give an expansive feeling to the sky. Brighter blue in the upper sky and blue/purple for the lower were chosen to help lead the eye down, as were the predominantly slanting groutlines in the sky.  Flower stem and leaf center vein lines help lead the eye around to the focal flower.
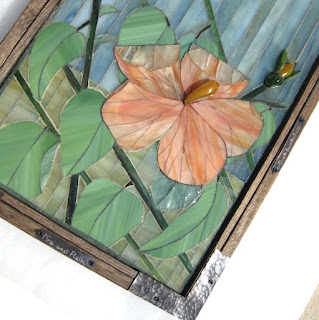
Detail view of 'rain' side of glass on glass mosaic titled "Fire and Rain" by artist Linda Pieroth Smith
'Fire" side of "Fire and Rain" - detail
But for the 'rain' side, I wanted a more somber mood. Muted colors were key but were carefully chosen so each area was distinct. The central flower is still the focus but construction here was completely different from the 'fire' side.

Textured glass was used where the petals folded from the weight of the rain; very smooth glass for the un-folded portions.

First, the petal shapes were cut in one large piece each, then the petal was scored/broken along vein lines. The pieces, when reassembled and glued in place, had barely any space for grout but enough that a subtly deeper tone of grout defined the vein lines. Click photo for larger view.

Leaf orientation is more somber on this side with their more vertical placement. Stronger emphasis on flower stems both aid in eye movement and contribute to a less-lush feel.

Both sides of glass on glass mosaic titled "Fire and Rain" by Linda Pieroth Smith, as viewed in the sunlight.
Both sides of "Fire and Rain" - viewed in sunlight
When working glass on glass, the importance of light must also be considered. Especially how the opaqueness of glass and grout on each side interact.

So the light would shine through the 'fire' side central flower, all the flower glass chosen was opaque enough to stand alone in dim light situations but translucent enough to let sunlight make the flowers glow.

Leaf and grass glass is all very opaque but the sky glass on both sides transmit light well. Narrow sky grout lines on the 'rain' side give that side a rain effect but, since they are narrow, only add subtle depth to the 'fire' side sky.

Finishing details: Mosaic is set into a wood frame with a black patina and secured with hand crafted solid copper L brackets that have been hammered and also have a black patina. Mosaic title and artist signature are engraved on small copper plates.

"Fire and Rain" has sold.

I create original design silver jewelry too!! 
https://www.mosaicsmith.com/collections/all   or
https://www.etsy.com/shop/MosaicSmith

Wednesday, July 11, 2012

Reversible Mixed Media Glass on Glass Mosaic - Part 1

This series of posts will highlight some of the how-to on the making of my "Fire and Rain" glass on glass reversible mosaic. Below is the finished main flower on the 'Fire' side. Click images to enlarge.
Fire side of "Fire and Rain" glass mosaic window art by Linda Pieroth Smith
Fire side of "Fire and Rain" 9 7/8" x 14 3/8"
The flowers on this side are all made up of individually mosaiced flower petals.

First I cut up a clear glass jar that previously had been used to hold spaghetti sauce. The wide mouth made it easy to use wheeled nippers to get in there to break the glass. Look at the jars in your pantry and you may also see some with interesting curves to the jar glass, especially those with non-vertical sides.  This one had a nice wide curved shoulder area that then sloped down to a highly curved sort of foot area.

Shows five glass shaped flower petals to be used in hibiscus flower mosaic.
Each of those five flower petals above is one large piece of shaped clear glass.
  • Once I had my jar broken into large chunks, I played with their orientation so the curves resembled flower petals.  
  • Then I marked them with a sharpie marker and nipped them into their final shape with my wheeled nippers. 
  • I finished the shaping with my grinder to ensure no sharp edges and to give the edges a 'frost' look.
  • When I was happy with their shape, I used GE Silicone II glue to attach them to a sheet of clear glass as well as to each other.

Next step was to prepare the colored glass for the mini mosaics for the flower petals.

Glass bits being prepared for glass on glass mosaic.

I nipped narrow, about 1/8",  bits from colored glass. My plan was to use these bits cut side up on top of the petals. Then the natural curve they have from the wheeled nippers could be used to follow the curve of the clear glass petals. BUT, people touch mosaics! So, to smooth the sharp edges of all those little bits, I placed them all in a small glass jar, added water 3/4 of the way up and a bit of dish soap and then shook them.  And shook them.  And shook them some more. At least 10 minutes of shaking and they still had a semigloss sheen but no sharp edges.

Work in progress picture of glass on glass hibiscus flower for "Fire and Rain" mosaic by Linda Pieroth Smith
Finally, I could begin mosaicing!

Again, GE Silicone II glue was used to attach the prepared bits to the clear glass petals.

That yellow 'blob' in the center is a cool castoff from a glass blowing shop. It did not make the final mosaic but a similar one was used instead.

Lipstick red grout then completed the flower.  The flower buds on this 'Fire' side of the mosaic were completed the same way.  The green 3D pieces are also glass blowing castoffs.

Mixed media glass on glass mosaic titled "Fire and Rain" by Linda Pieroth Smith
"Fire and Rain"
Next post will be about the 'Rain' side of the mosaic.
Image at left shows both sides of the completed mosaic as it looks against a white background.

Part 2 of discussion of this mosaic can be viewed here: http://blog.mosaicsmith.com/2012/07/part-2-reversible-mixed-media-glass-on.html

"Fire and Rain" has sold.


I create original design silver jewelry too!! 
https://www.mosaicsmith.com/collections/all   or
https://mosaicsmith.etsy.com

Saturday, July 7, 2012

Urban Renewal - As Mixed-Media Mosaic Wall Art

Mixed-media mosaic wall art piece depicting a beautiful weed growing in old, cracked concrete.
Urban Renewal 8.5" x 10.5"
Inspiration is sometimes found in unexpected places and in this case it was an abandoned parking lot around the corner from where my daughter takes guitar lessons. I've seen it weekly for years now but stopped for a closer look one day...

(Click on images to view larger size.) 

Pieced predominantly from stained glass onto a hardibacker concrete board. The broken 'concrete' areas are broken pieces of granite tile placed in with the riven edges showing.  Grey tinted thin-set mortar fills the space between large broken areas of 'concrete'- the strong diagonal line- and is used to adhere the granite pieces as well.


A print of this mosaic is available on Fine Art America:
http://fineartamerica.com/artists/19+linda+smith

I create original design silver jewelry too!! 
https://www.mosaicsmith.com/collections/all   or
https://www.etsy.com/shop/MosaicSmith

Friday, January 28, 2011

How To Make Concrete Mosaic Garden Art Ball

You can make very fun garden art using found objects and scrap glass.

This post details how I made the garden ball pictured above, using a glass globe from an old pendant light fixture. You likely don't have one of those handy :) , but a little thinking outside the box and you can come up with other unique 'molds' to make bases for your own personalized garden art.

First- some general supplies:
  • Some sort of 'mold'. Ideas- glass bottles, plastic containers such as milk bottles, takeout food containers... IMPORTANT: If you use a plastic form, you must have an opening wide enough for the cured concrete to be removed through. For milk jugs, cut off the entire top before adding concrete mix. The opening needs to be as wide as the widest part of your shape.
  • concrete mix
  • eye protection!, hammer, prying tools
  • glass nippers
  • scrap stained glass- often local stained glass shops will sell scrap by the pound or ebay and etsy both often will have listings for scrap.
  • thin set mortar
  • grout
Before adding concrete mix, I lightly coated the inside of the shape with a mold release- Vaseline but cooking spray will work in a pinch.

Add concrete mix slowly and tap occasionally (with your hand!) to raise air pockets. Don't want to break that glass yet! If your shape includes thinner sections, you will want to reinforce them with hardware cloth sections embedded in the center. See my stepping stone instructions.

If you use a plastic form, you can unmold, carefully, usually after one day.

If you use glass, WAIT a minimum of 10 days for the concrete to cure before breaking glass. Full cure is at 30 days.


Be sure to wear eye protection when breaking the glass off! I used both the hammer and the knob end of a glass scorer to break the glass in sections. Old dental tools and flat blade screwdrivers worked well to pry off sections.

Now that you have your blank concrete 'canvas', have fun creating!! I used the glass I removed to make the white flowers on my garden ball. They were especially pleasing to work with because the glass was curved and fit nicely back on the ball. I used thin set mortar to attach my glass. This is a weather friendly glue though if you live in a freeze zone, mosaic art lasts longer if brought inside in winter.

For adding flat glass to curved sections, smaller pieces fit around the curves better- and are less hazardous! Use extreme care when handling your piece as there will likely be sharp exposed points and edges. Grouting will minimize this.


I don't just play with concrete!! 

I create original design silver jewelry too!! 
https://www.mosaicsmith.com/collections/all   or
https://mosaicsmith.etsy.com

Wednesday, August 5, 2009

Custom Order Wedding Stepping Stone


Ack
, falling behind a bit on the blogging what with kids off for summer vacation.

I teased about this stepping stone way back in June but never showed the finished stone. So here it is finally. Wedding colors are celadon green and chocolate brown.
Pieced in reverse with stained glass. I then used this method to make it into a poured concrete stepping stone. A bit of the detail- bee has iridescent glass for wings and the black body stripes have tiny gold flecks in them to pick up the light too.
~~~~~~~

I don't just play with concrete!! 


See my Etsy MosaicSmith shop for available mosaic art:

https://www.etsy.com/shop/MosaicSmith?search_query=mosaic+art 


I create original design silver jewelry too!!

http://MosaicSmith.com

Tuesday, June 16, 2009

Piecing a Mosaic Rose

Who knew, dressmaker's tracing paper can also be used to trace a design on glass. I used this method first when making my self portrait mosaic.

Here I use it to make a rose. Yes, green. This is part of a custom stepping stone for a wedding and it will also have green hydrangeas. Looks pretty combined with the chocolate brown for the writing. Still a WIP so I'll post more pictures later.


First tip is to make sure your glass is very clean.

This method also works best if the sections of your motif can be systematically cut away from the design and still keep the pieces whole. This pattern I made was almost ideal. Piece # 16 ended up in three pieces.

I also numbered the pattern and glass pieces to make putting it back together so much easier.

~~~~~~~

All available mosaic art:

I also create original design silver jewelry:

Wednesday, February 4, 2009

WIP Egret Mosaic (Curious Neighbor)


Waaaay back in May 2008 I posted my first WIP picture for this guy. I have finally in the last few weeks made some much awaited progress on him. The orange glass worked out perfectly for his beak and I found a way to incorporate shells that I picked up at the beach by where I photographed him.
Click the picture for a larger view.


~~~~~~~
This mosaic is part of my personal collection. You can view it here: http://blog.mosaicsmith.com/2009/10/shading-grout.html
Prints are available from my page at Fine Art America: http://fineartamerica.com/artists/19+linda+smith

I also create original design silver jewelry: http://MosaicSmith.com

.

Tuesday, September 16, 2008

Interloper WIP

This morning I finally got a chance to play with an idea I've been working on for a little clock. It is loosely based on the bouquet in the photo.

The clock will be in the large pink flower and I plan on attaching a sweet little bee bead to the minute hand- so that's where the title of this clock comes from.

At the moment I think I'll fill the background with a deep green tone on tone look of leaves and random shapes. Because I want the clock hands (black) to be visible, the grout for the pink flower will be a light green and then deepen to darker green going toward the perimeter. I shaded the grout once before and was pleased with the result.


~~~~~~~

SOLD

I create original design silver jewelry too!! 
https://www.mosaicsmith.com/collections/all   or
https://www.etsy.com/shop/MosaicSmith

Monday, May 19, 2008

R Cubed

As in reduce, reuse and recycle.

My studio is in our garage due to space and safety issues (flying glass bits from nipping shapes) and shares space with normal garage items (also due to space issues), including our recycling bins. So that visual inspiration, combined with my innate thriftiness, combined with my brain still kicking around an exact plan for my egret (see previous post), brought my mosaic muse to create this little mosaic.

I took step by step photos:


All the tesserae for this mosaic are recycled.


  • I used an aluminum can bottom for the flower center and folded strips of aluminum can for the flower stem (Any guesses on what was originally in that can?).

  • The aluminum rectangle is a castoff from my husband's project and the '3' is made from leftover stainless steel picture wire.

  • The white glass for the flower and blue/plum glass are leftover bits saved from other mosaics.

  • The green glass was a wine bottle and the brown glass in the flower center was previously a beer bottle neck. I like the way the tight curve adds dimension.

  • Neighbors added contributions also by donating mirror and the textured amber background glass after remodeling projects.

The first step in grouting is always a bit of a concern, but after a bit of sponging comes the big reveal.


Saturday, August 25, 2007

New WIP- Dahlia Star Mosaic Clock

I thought I'd start off my blog with work in progress (WIP) pictures of my latest mosaic clock.


This mosaic is a bit of a departure for me since pink is usually NOT on my favorites list. Not that I hate it or anything but if you check my other work you see that I have a strong affinity for orange. So, because I know orange is a color that people have strong feelings about, I pulled out some other colors to play with. This came together from an inspiring magazine photo of a Dahlia, a clock works I had with great scroll hands and nice deep brown pieces I had left from another project. I just started playing. The color pieces are stained glass. The substrate is a 12" x 12" piece of concrete board attached with brass screws to a solid pine support frame.

The rest of the design evolved to solve the problem of how to indicate time- this is a clock after all. I hate clocks that make you guess too much. I always indicate at least where the hour numbers are in a creative way. My quilting background is showing here- I used a 12 point star of my own design and cut out little graph paper patterns. A sharpie is essential for marking glass- quilting rulers are fantastic with glass too.


Looks like I'm nearing the end now that the top glass is all laid out? Not quite. Next up is a date with a cup, or two, of thin-set mortar. Each piece is now individually back buttered with thin-set and put back into place. Popsicle sticks are wonderful. So are tweezers and dental probes. And that ruler was handy again to make sure the clock hour indicators were where they belong. The whole gluing process took about two hours. Well, that did include time using the grinder to fit the inner white triangles around the flower petals.

The clock hands are just laying on top to approximate the finished look. I'll grout this in white most likely. But first I need to add glass to the edges. I also need to paint the back of the mosaic to seal it and add the clock works and hanging wire. After it is grouted, I'll seal the grout as well. Then look for it for sale on etsy.


 ~~~~~~~

This clock has sold.

I create original design silver jewelry too!! 
https://www.mosaicsmith.com/collections/all   or
https://www.etsy.com/shop/MosaicSmith