MosaicSmith Blog

Showing posts with label mosaic. Show all posts

Sunday, July 27, 2014

Reaching Mosaic Wall Art - Adventures with Pennyround Tiles and Shading


Reaching   28.5" x 11.5"
(Click photo to view larger image.)


Several years ago, out of the blue, during a time when I was struggling, as a Mom, with my oldest child growing into an adult, I had a strong vision: a gloriously colored piece of fabric stretching and reaching towards brightness....My daughter.


I got busy sourcing glass and tile to match my vision. Many sheets of stained glass in an array of colors. Matte black (and a bit of grey) unglazed porcelain tile for the background. 


Detail: uncut penny round tiles


Black glass pennyround tiles with an iridescent finish that varied from plain black to silver, to gold and multicolor.
  
These I nipped so as to use just the curved edge.  


Left: sorted pennyround tile bits. Right: sorted glass rectangles.


I created, from wood and hardibacker concrete board plus mesh and thin-set mortar, a 3D substrate on which to piece the colorful 'fabric'.
 
Finally, I hand cut many, many tiny rectangles in a rainbow of colors and shades from black to bright from the sheets of stained glass.


The beginning!


The process of gathering and figuring took three years.

During that time, my daughter continued to grow towards her bright light and she shines!!


The background I pieced with the unglazed porcelain tile and added subtle depth through use of smaller piece sizes along the center left, as well as a couple of perspective lines in the grout. 

I also added in very thin pieces of dark grey tile- the light source.
The last piece!  

I grouted the background with black and did a shaded grout on the woven section with pale grey at the top through black at the bottom.

This mosaic hangs in a special space in my home!


I create original design silver jewelry too!! 
https://www.mosaicsmith.com/collections/all   or
https://mosaicsmith.etsy.com

Tuesday, April 15, 2014

New Glass on Glass Mosaic Clocks

Once again, time has gotten away from me and I have not updated here for a while. I HAVE been busy creating, and, ironically, much of the mosaics I have created recently have been clocks!

Have I mentioned I hate to throw away any bits?

I have been working, for a couple years (!), on gathering the pieces necessary to create a mosaic I had a vision of. This mosaic is a bit different than my usual style. The focal of the vision piece will use rectangles of stained glass shaded from dark to bright with each color value all in a line. To achieve this, I cut a LOT of tiny rectangles and, of course, had left over bits. Not garbage! I found a use for them :))

A baker's dozen of uses:

https://www.etsy.com/shop/MosaicSmith?section_id=11136316
Plus:

Monday, December 2, 2013

Adventures in Mixed Media Mosaics

A few weeks ago I finished a mosaic in which I incorporated some new (to me) techniques. I oddly (again, for me) did not take work-in-progress pictures for this. Perhaps because I started it last spring and put it aside when it stopped 'talking to me'. Which was mid-layer of what turned out to be the first of four layers.

When it went silent, I propped it against the wall at the back of my work table. Where it remained silent, except for occasionally mocking me, *sigh. Until I moved it one day, then returned it to the wall- backwards.

Wow, new view, new vision!

The result:
"Misty Morning"


So..four layers. From the uppermost: Layer one is branches composed of glass drips from an glass blowing shop plus a few glass leaf beads, as well as copper enameled leaves and a copper enameled lizard that I created from sheet copper and powdered enamels + my torch.

Layer two is broken tempered glass glued to a sheet of clear picture glass and then grouted in warm pale grey.
Layer three is the back side of the picture glass and actually was the original mosaic I began last spring. It originally was to be the front of the piece. Inspiration struck when I viewed it from the back. It looked like a foggy morning!! Never did 'finish' this layer, at least as far as my original thought was concerned. This layer was left ungrouted and remains about where I left it in the spring because it worked perfectly for viewing the painted layer (#4).

Layer four is painted on a thin backer board and is mainly the sky and grassy area you can see in the photo.

A couple closeups:

I suppose the enameled bird could be called layer five since it is glued to the picture glass. When viewed from the front, the bird is under the tempered glass.

Friday, October 11, 2013

More Mixed-Media Mosaics - Playing with Enamels

Catching up the blog with a few pieces not mentioned here already. (But if you follow me on Facebook, these may be old news. And, if you don't, why not?? :D )  Link to my Facebook page is right over there. ==>

I have been continuing to play with the enamels and torch. Really love this process!!

Most recently, I completed several mosaics in my "Interloper" series. These are all based on photos I took this summer on a visit to Tybee Island, Georgia.
"Interlopers", "Morning", "Lost"
Small ones measure 5" x 5" and middle one measures 5" x 17" overall (each section is 3" x 5") Each includes hand-cut copper torch-enameled elements.

The top one, called "Interlopers" has been donated to fundraiser for Arts Council of Hillsborough County. 

The middle compilation is called "Morning" and the bottom is called "Lost". These two are available on my Etsy site currently. (See 'Purchase' tab above.)   Edit: These have sold.

All my available mosaic art:  https://www.etsy.com/shop/MosaicSmith?search_query=mosaic+art

~ ~ ~ ~ ~

I also completed a desk clock featuring a couple of my torch enameled pieces, including a whimsical...bird. Definitely a theme with me lately!
"The Early Bird Catches the Worm" - Desk Clock
Clock measures about 5" x 8" and, in addition to the funky bird, features a custom clock minute hand in the shape of a worm. A tiny flying bird and three millifiori flowers denote the 12,3,6&9 hours. I had fun with this piece! 
All my available clocks: https://www.etsy.com/shop/MosaicSmith?search_query=clock 

~ ~ ~ ~ ~

While I was playing with the torch to make the clock elements, I also created a few necklace pendants. Yup, these are available in my too! 
https://www.etsy.com/shop/MosaicSmith?search_query=pendant 
~ ~ ~ ~ ~

Currently, I am working on several pieces, WIP pictures soon.  I will be part of a three women Mixed-Media Show at our regional library in November and December.  More on that later too.

Monday, February 25, 2013

Silent Beauty - Mixed Media Mosaic Butterfly

My butterfly wall mosaic, pieced from stained glass and Mexican smalti glass, is now complete!
"Silent Beauty"

From a photo I took of a Mangrove Buckeye Butterfly at the Manatee Viewing Center, FL
~ 11" x 7" . 

The butterfly portion was pieced from stained glass using a double indirect method.  See previous post for a WIP picture.  After piecing (on sticky paper), I glued paper to the face, flipped the mosaic and peeled off the sticky paper. I then adhered it to a section of concrete board using thin-set mortar. This portion is grouted in mocha brown.

The background was pieced with Mexican smalti laid with the direct method. The flowers and major leaves pieced first, then the accent reeds in tan, and finally the rest of the background. The background is grouted in black. Generally smalti type glass is not grouted, but the Mexican type is smooth on the face (vs the Italian type that is used cut edge up and often will have tiny air bubbles that fill in when grout is used) and I felt the black grout would help the background to recede and the butterfly to 'pop'.  

Finished with an edge of black stained glass. Wired and ready to hang.

Wednesday, January 16, 2013

New Mosaic Art Butterfly WIP

Butterfly measures about 9" x 5" and is pieced from stained glass. Working title is "Silent Beauty". Finished mosaic will measure about 10 3/4" x 7".  {Odd size, yup. I've a few of these odd sized small boards on hand. Might make a related series with them. And then move on to using standard sizes that can be easily framed!}

I started this project last month and then stalled while I pondered how to approach the background (earlier WIP picture in previous post).

Next up: Transfer this to a piece of concrete board. Right now it is assembled on clear contact paper and you are looking at the right side. I'll glue paper to the face, remove the contact paper from the back, glue the butterfly to the concrete board then remove the glued paper.

The idea is that the butterfly will have a beautiful smooth texture and the background will be more highly textured for contrast.  I've decided to use smalti for the background. That should give it a nicely textured look and the uniform material will not detract too much from the focal. And I get to play with smalti :)

Wednesday, September 19, 2012

See my Fire and Rain Mosaic in Person

Edit: This show has closed. The mosaic window is now available in my Etsy MosaicSmith shop - direct link.

My "Fire and Rain" mosaic is currently on display as part of the Member's Show at the Morean Arts Center in St. Petersburg, FL.  If you happen to be in St. Petersburg before October 28th, do stop in and check out the exhibit.  Over 180 fantastic pieces of local art- many of which are for sale.


I was honored to receive an honorable mention award for this piece at the opening reception.

The gallery is at 719 Central Avenue and, behind the gallery, don't miss the Hot Shop! Some of the glass in the flower buds on the Fire side of this mosaic are broken bits from Morean hot shop glass.

"Fire and Rain" has sold.
All available mosaic art:
https://www.etsy.com/shop/MosaicSmith?search_query=mosaic+art

Sunday, July 15, 2012

Part 2 - Reversible Mixed Media Glass on Glass Mosaic

Part one of my discussion of my "Fire and Rain" glass on glass mosaic can be found here: http://blog.mosaicsmith.com/2012/07/reversible-mixed-media-glass-on-glass.html

Both sides of a reversible glass on glass mosaic titled "Fire and Rain" featuring a hibiscus flower.
Both sides of "Fire and Rain"
I should clarify- this mosaic is a bit more than a simple glass on glass project. It is really all about layers and could more properly be described as a glass sandwich where a pane of clear glass is the 'filling' and the 'bread' on each side are two unique, but related, mosaics. In addition, the focal flower on the 'fire' side is mosaiced on an additional layer of curved clear glass for the petal. (This process is the focus of Part 1, linked above.)

This post will focus on the process and design decisions for the 'rain' side mosaic.


The 'fire' side needed an upbeat mood.  Clear, vibrant, colors were chosen for that side and the leaves were oriented in a predominantly upbeat position as well. The grout lines for the sky were deliberately random but piece sizes graduated smaller going toward the horizon to give an expansive feeling to the sky. Brighter blue in the upper sky and blue/purple for the lower were chosen to help lead the eye down, as were the predominantly slanting groutlines in the sky.  Flower stem and leaf center vein lines help lead the eye around to the focal flower.
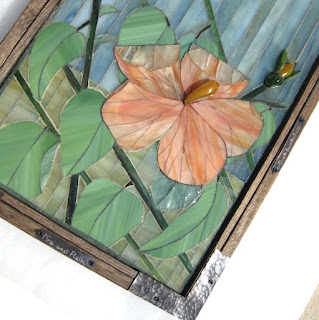
Detail view of 'rain' side of glass on glass mosaic titled "Fire and Rain" by artist Linda Pieroth Smith
'Fire" side of "Fire and Rain" - detail
But for the 'rain' side, I wanted a more somber mood. Muted colors were key but were carefully chosen so each area was distinct. The central flower is still the focus but construction here was completely different from the 'fire' side.

Textured glass was used where the petals folded from the weight of the rain; very smooth glass for the un-folded portions.

First, the petal shapes were cut in one large piece each, then the petal was scored/broken along vein lines. The pieces, when reassembled and glued in place, had barely any space for grout but enough that a subtly deeper tone of grout defined the vein lines. Click photo for larger view.

Leaf orientation is more somber on this side with their more vertical placement. Stronger emphasis on flower stems both aid in eye movement and contribute to a less-lush feel.

Both sides of glass on glass mosaic titled "Fire and Rain" by Linda Pieroth Smith, as viewed in the sunlight.
Both sides of "Fire and Rain" - viewed in sunlight
When working glass on glass, the importance of light must also be considered. Especially how the opaqueness of glass and grout on each side interact.

So the light would shine through the 'fire' side central flower, all the flower glass chosen was opaque enough to stand alone in dim light situations but translucent enough to let sunlight make the flowers glow.

Leaf and grass glass is all very opaque but the sky glass on both sides transmit light well. Narrow sky grout lines on the 'rain' side give that side a rain effect but, since they are narrow, only add subtle depth to the 'fire' side sky.

Finishing details: Mosaic is set into a wood frame with a black patina and secured with hand crafted solid copper L brackets that have been hammered and also have a black patina. Mosaic title and artist signature are engraved on small copper plates.

"Fire and Rain" has sold.

I create original design silver jewelry too!! 
https://www.mosaicsmith.com/collections/all   or
https://www.etsy.com/shop/MosaicSmith

Wednesday, July 11, 2012

Reversible Mixed Media Glass on Glass Mosaic - Part 1

This series of posts will highlight some of the how-to on the making of my "Fire and Rain" glass on glass reversible mosaic. Below is the finished main flower on the 'Fire' side. Click images to enlarge.
Fire side of "Fire and Rain" glass mosaic window art by Linda Pieroth Smith
Fire side of "Fire and Rain" 9 7/8" x 14 3/8"
The flowers on this side are all made up of individually mosaiced flower petals.

First I cut up a clear glass jar that previously had been used to hold spaghetti sauce. The wide mouth made it easy to use wheeled nippers to get in there to break the glass. Look at the jars in your pantry and you may also see some with interesting curves to the jar glass, especially those with non-vertical sides.  This one had a nice wide curved shoulder area that then sloped down to a highly curved sort of foot area.

Shows five glass shaped flower petals to be used in hibiscus flower mosaic.
Each of those five flower petals above is one large piece of shaped clear glass.
  • Once I had my jar broken into large chunks, I played with their orientation so the curves resembled flower petals.  
  • Then I marked them with a sharpie marker and nipped them into their final shape with my wheeled nippers. 
  • I finished the shaping with my grinder to ensure no sharp edges and to give the edges a 'frost' look.
  • When I was happy with their shape, I used GE Silicone II glue to attach them to a sheet of clear glass as well as to each other.

Next step was to prepare the colored glass for the mini mosaics for the flower petals.

Glass bits being prepared for glass on glass mosaic.

I nipped narrow, about 1/8",  bits from colored glass. My plan was to use these bits cut side up on top of the petals. Then the natural curve they have from the wheeled nippers could be used to follow the curve of the clear glass petals. BUT, people touch mosaics! So, to smooth the sharp edges of all those little bits, I placed them all in a small glass jar, added water 3/4 of the way up and a bit of dish soap and then shook them.  And shook them.  And shook them some more. At least 10 minutes of shaking and they still had a semigloss sheen but no sharp edges.

Work in progress picture of glass on glass hibiscus flower for "Fire and Rain" mosaic by Linda Pieroth Smith
Finally, I could begin mosaicing!

Again, GE Silicone II glue was used to attach the prepared bits to the clear glass petals.

That yellow 'blob' in the center is a cool castoff from a glass blowing shop. It did not make the final mosaic but a similar one was used instead.

Lipstick red grout then completed the flower.  The flower buds on this 'Fire' side of the mosaic were completed the same way.  The green 3D pieces are also glass blowing castoffs.

Mixed media glass on glass mosaic titled "Fire and Rain" by Linda Pieroth Smith
"Fire and Rain"
Next post will be about the 'Rain' side of the mosaic.
Image at left shows both sides of the completed mosaic as it looks against a white background.

Part 2 of discussion of this mosaic can be viewed here: http://blog.mosaicsmith.com/2012/07/part-2-reversible-mixed-media-glass-on.html

"Fire and Rain" has sold.


I create original design silver jewelry too!! 
https://www.mosaicsmith.com/collections/all   or
https://mosaicsmith.etsy.com

Saturday, July 7, 2012

Urban Renewal - As Mixed-Media Mosaic Wall Art

Mixed-media mosaic wall art piece depicting a beautiful weed growing in old, cracked concrete.
Urban Renewal 8.5" x 10.5"
Inspiration is sometimes found in unexpected places and in this case it was an abandoned parking lot around the corner from where my daughter takes guitar lessons. I've seen it weekly for years now but stopped for a closer look one day...

(Click on images to view larger size.) 

Pieced predominantly from stained glass onto a hardibacker concrete board. The broken 'concrete' areas are broken pieces of granite tile placed in with the riven edges showing.  Grey tinted thin-set mortar fills the space between large broken areas of 'concrete'- the strong diagonal line- and is used to adhere the granite pieces as well.


A print of this mosaic is available on Fine Art America:
http://fineartamerica.com/artists/19+linda+smith

I create original design silver jewelry too!! 
https://www.mosaicsmith.com/collections/all   or
https://www.etsy.com/shop/MosaicSmith

Tuesday, February 21, 2012

Who Recycled, a Glass Mosaic Owl Portrait


'Who Recycled'
Scroll down to see construction slide-show
I recently completed this 6" x 6" framed glass mosaic for Lin Schorr's Sept 2012 Auction benefiting Doctor's Without Border's.
www.flickr.com/photos/linlee8/6260969290/in/set-721576279...
The frame inspired this piece and was found at a local fundraising sale. It likely was a sample frame for a frame shop.
The owl is from a photo I took of the one who lives at the Florida Aquarium in Tampa. The pose and texture went nicely with the frame.
Continuing the recycled theme, the substrate is from a piece of scrap hardibacker concrete board that otherwise might have been thrown away. The owl glass is all from little scrap bits and the background is nipped from wine bottles.


To see slideshows from other mosaic projects, click 'Slideshow' in label cloud in right margin.

Although the original "Who Recycled" has sold, a print is available on my page at Fine Art America:
http://fineartamerica.com/artists/19+linda+smith

All available mosaic art: https://www.etsy.com/shop/MosaicSmith?search_query=mosaic+art

I make sterling silver jewelry too!!  http://MosaicSmith.com https://mosaicsmith.etsy.com

Monday, January 16, 2012

More Shading Grout in a Mosaic


Revisiting the topic of shading grout in a mosaic. In a previous post I shaded using two grout colors.

For this project, I shaded between four grout colors. The fade from deep black/green to pale green was chosen to enhance the glass shading.

First step was to play with mixes to find the effect I wanted. I used a plastic spoon, leveled off with a wooden stir stick as a measuring device. Stirred well, the dry mix color will be approximately the same as the finished, cured, color.

(Each recipe was written on the cup so it can be duplicated in the future, assuming those grout colors can be obtained. I used the colors black, mallard green, tea green and straw [no, not pear like it says on the cup, oops :] - for those that might have those colors on hand.)


Working from light to dark, I laid in each color. Since my substrate was glass, I marked it off into sections on the reverse using a sharpie marker. You might be able to see that in the first picture- green marks.

Picture on the right shows the grouted project before much 'smooshing' has happened.


In the left picture, you can see the results of careful cleaning. **Note: NO WATER, and no sponge, is used for this cleaning method.

First I removed excess grout. I started from the light end and moved across the piece from side to side just within that color. Then cleaned my tool (my finger!) and moved down a bit and repeated until I removed a lot of the excess from the entire piece.

Still with the grout very wet and soft, I started again at the light end removing a bit more grout but this time made a zig zag line across from side to side. I continued on down toward the dark end in this zigzag manner and this helped to blend each grout section.

At this point, much of the excess grout has been wiped off and I waited a bit for a haze to develop. I then used a soft cloth to remove the haze, again starting from the light end and working across from side to side. I used a clean section of cloth for each pass.

And here is the finished project, a wall clock.


SOLD

I create original design silver jewelry too!! 
https://www.mosaicsmith.com/collections/all   or
https://mosaicsmith.etsy.com

Wednesday, January 11, 2012

Anatomy of a Glass Mosaic Light Switch Cover


Click photos to enlarge.

Well, my way of putting switch plates together..

Choose a sturdy, commercially made, base to attach your mosaic to.  I now use metal bases. I have used wood in the past, but had problems with warping during grouting, especially for the larger sizes (yup, wood and water don't don't play nice together). And I feel the plastic covers have a bit too much flex, at least the ones my sources carry.

Attach your design with your favorite glue- Weldbond, silicone...

Grout! Such a simple, yet critical step.


  • Color choice is key. If you are going to add a resin coat, like I do for all mine, you need to base your selection on the wet grout color. Photo at left shows the cured grout color. Looks kind of blah and washed out this way but, when covered in resin, it will revert back to the beautiful contrasts of the wet grout color.
  • If you use glass for your design, use fine grit sandpaper on all exposed edges before grouting.
  • Use wood toothpick, or similar tool, to gently recess the screw hole and to shape the switch or outlet openings. It's got to fit in its new home!
  • Properly cure the grout before adding resin.

To protect fingers from sharp edges, and to protect grout from finger oils, all my switch plates receive a top coat of a two part resin epoxy. Quite a messy step, and a bit time consuming, but well worth it.
  • Read the directions for the resin carefully before you begin and follow them exactly.
  • Choose all disposable materials for mixing and stirring and be sure you cover your work surface!!
  • Also, be sure to elevate your project so the excess resin has a place to run off onto. I use a cardboard cylinder or large plastic cups.

Final step- for a complete pulled together look, custom color your screws.

I create original design silver jewelry too!! 
https://www.mosaicsmith.com/collections/all   or
https://mosaicsmith.etsy.com

Friday, January 28, 2011

How To Make Concrete Mosaic Garden Art Ball

You can make very fun garden art using found objects and scrap glass.

This post details how I made the garden ball pictured above, using a glass globe from an old pendant light fixture. You likely don't have one of those handy :) , but a little thinking outside the box and you can come up with other unique 'molds' to make bases for your own personalized garden art.

First- some general supplies:
  • Some sort of 'mold'. Ideas- glass bottles, plastic containers such as milk bottles, takeout food containers... IMPORTANT: If you use a plastic form, you must have an opening wide enough for the cured concrete to be removed through. For milk jugs, cut off the entire top before adding concrete mix. The opening needs to be as wide as the widest part of your shape.
  • concrete mix
  • eye protection!, hammer, prying tools
  • glass nippers
  • scrap stained glass- often local stained glass shops will sell scrap by the pound or ebay and etsy both often will have listings for scrap.
  • thin set mortar
  • grout
Before adding concrete mix, I lightly coated the inside of the shape with a mold release- Vaseline but cooking spray will work in a pinch.

Add concrete mix slowly and tap occasionally (with your hand!) to raise air pockets. Don't want to break that glass yet! If your shape includes thinner sections, you will want to reinforce them with hardware cloth sections embedded in the center. See my stepping stone instructions.

If you use a plastic form, you can unmold, carefully, usually after one day.

If you use glass, WAIT a minimum of 10 days for the concrete to cure before breaking glass. Full cure is at 30 days.


Be sure to wear eye protection when breaking the glass off! I used both the hammer and the knob end of a glass scorer to break the glass in sections. Old dental tools and flat blade screwdrivers worked well to pry off sections.

Now that you have your blank concrete 'canvas', have fun creating!! I used the glass I removed to make the white flowers on my garden ball. They were especially pleasing to work with because the glass was curved and fit nicely back on the ball. I used thin set mortar to attach my glass. This is a weather friendly glue though if you live in a freeze zone, mosaic art lasts longer if brought inside in winter.

For adding flat glass to curved sections, smaller pieces fit around the curves better- and are less hazardous! Use extreme care when handling your piece as there will likely be sharp exposed points and edges. Grouting will minimize this.


I don't just play with concrete!! 

I create original design silver jewelry too!! 
https://www.mosaicsmith.com/collections/all   or
https://mosaicsmith.etsy.com

Monday, December 27, 2010

Mosaic Art Auction to Benefit Doctors Without Borders

'Dragonfly'
8" x 10" (20 x 25.5cm)
Click image to view larger

Lin Schorr is coordinating, and 126 mosaic artists from around the world have donated pieces for, an on-line auction of mosaic art to benefit Doctors Without Borders/Médecins Sans Frontières (MSF). Above is my mosaic art donation.

About the Show/Auction:
The on-line auction was April 1-27, 2011.

About 'Dragonfly':
Dragonfly is from a photo I took of a happy dragonfly visiting my Tangelo tree.

He is a layered 3D mosaic composed of a base layer of leaves created with stained glass, more stained glass create three leaves at the bottom and lower left.

The dragonfly himself is pieced from glass gems and glass found in the cull pile at the old Levay Glass Factory (Old Milton School House in Alton, Il- currently under renovation- see their facebook page.) There is a bit of brown bottle glass in there too. His legs are copper wire coated with grout/weldbond glue and the wings are clear glass etched with an engraving tool .

All exposed glass edges are wet sanded to soften the sharp edges. Frame is painted wood and the back is sealed with paint as well. Wired for hanging with stainless steel wire. Interested in in-progress photos? There are a few in my MosaicSmith flickr account.

Although this has sold, I have other mosaic art available:
https://www.etsy.com/shop/MosaicSmith?search_query=mosaic+art

I create original design silver jewelry too!!
http://MosaicSmith.com

Saturday, November 20, 2010

Making of my Mosaic 'Journey' Wall Art


"Journey"
10" x 10"
Click to enlarge

My mosaic, 'Journey', in addition to the obvious, tells the story of my own mosaic journey beginning with the use of glass tile (on reverse), to stained glass (front outer section), to a mix of tessearae and most recently exploring the use of smalti glass (center square).

There is actually a third journey to this piece and that is the transformation of an ordinary IKEA Malma mirror (see second photo below) into the substrate for this mosaic.

Some background: This mosaic began with a call to artists with a stipulation for square mosaic art. Hmm. I remembered the square IKEA mirrors I have. OK, that might work. And the square format seemed like a good fit with a photo of a gorgeous sunset I took this summer (from the passenger seat :). With these two ingredients in mind, I mulled this over and came up with the mosaic journey concept.

The journey begins on the reverse where I reproduced a wall quilt I made years ago. Vitreous tile was used since it was the first material I played with to create a simple mosaic table top. This represents my transition from piecing with fabric to piecing with glass.

I used a border of thick glass to make the surface level. I filled in the center mirror back area to level the surface as well- visible here as the gold in the spaces as this is before grouting.


These IKEA mirrors are very plain and simple ==>

But they have a broad flat border and a recessed mirror that would work here to add depth to the scene.


To further add depth I built up a third level around the perimeter using 2" wide black glass. And to frame that, I used 1/4" thin glass strips on top of the 2" wide glass.
Note- I used mitered corners throughout to add to the one point perspective of the image.


Each section is divided with strips of stained glass, placed on end. (I use wet sanding paper along the long edge corners to reduce sharpness of glass whenever I place it on end like this- people like to touch mosaics!)

Here you can see I chose to color coordinate the frame around the center (smalti on mirror) section but used solid black to divide the outer-most pieced stained glass area from the mixed-media center section.

A note on glue- Most of this mosaic is pieced using Weldbond but the smalti was attached to the mirror using silicone adhesive. To eliminate any reflection in the space between the smalti, I made sure there was silicone glue on all exposed bits of mirror.

The mosaic was finished with more strips of black on the outer edges and grouted in black and natural grey. And not a bit of the original IKEA mirror is visable, front or back.


I create original design silver jewelry too!! 
https://www.mosaicsmith.com/collections/all   or
https://mosaicsmith.etsy.com