MosaicSmith Blog

Showing posts with label how_to. Show all posts

Monday, June 9, 2014

How to Make: Homemade Shield for a Glass Grinder


When I rearranged by work space recently, I moved my glass grinder. Better location in most respects, with the big exception of an electrical outlet right behind the new location. Directly in the path of the lubricating water spatter!

My solution was to modify a large IKEA Trofast storage bin.

I turned the bin upside down and sat it on the lid. Using a red grease pencil, I drew in cutting lines. About 3" up from the new bottom and about 4.5" into each side. I also cut out the depression in the new top area (previous bottom of the bin).

My Dremel tool, with a cutting wheel, worked quite well to modify the bin. Make sure you use eye protection! Some melted bits of plastic did go flying.

Saturday, November 16, 2013

WIP Pictures from the Creating of My Latest Shell Mosaic

During the creation process for my "Whatcha Doing" mosaic, where the Egret bird is pieced from sections of shells, I took quite a few photos I thought I'd share.


"Whatcha Doing?"
I decided to piece the bird with shells because I thought the natural material dove-tailed well with my inspiration photo- an Egret visiting a waterfront party; natural & man-made.  I have quite a few shell that I have picked up at the beaches here in Florida.  They tend to be rather sea-worn and sun-bleached, which actually works well with the egret's coloring. So I had a plan. Next decision was to use sections of the shells rather than whole shells as is typical with shell mosaics. Out came my trusty Dremel! And after a test with the cut-off attachment, yikes!, I also put on a dust mask!!

 I used sections of this Moon shell to shape the bird's head.


The eyes were tricky. I used a small spiral shell for the left and a barnacle on the right.  (Click the photos to view large images.)

Monday, August 6, 2012

More: How to Make Glass Numbers and Letters to Mosaic

Image of Saral Transfer Paper
Find at art and fabric stores in rolls or sheets.
Tracing the image onto glass using transfer paper.
I did another post a while back on making stained glass numbers but wanted to re-visit the subject with a couple additional tips and more photos.

This method will make letters and numbers that appear, from a distance, to be one piece of glass although actually composed of sections. Very useful for readability of house numbers and signs.


[Click images to enlarge.]

Previously I used a paper pattern to trace around. I have since found Saral Transfer paper, especially the yellow color, works quite well on glass. My red works ok as well, but not the blue and white. Don't know why. Maybe just my package??


Image transferred onto glass.

1. Make a template. First I type my words or numbers in a word processing program, select a font and size then print. For this method you will want an actual size printout.


 2. Trace your template. Clean your glass, then simply position your printout template over your selected section of glass, slip the transfer paper in underneath, and trace your image.

Not quite in the right place, need to re-do? The transfer on the glass will buff off or wipe off with a bit of glass window cleaner.
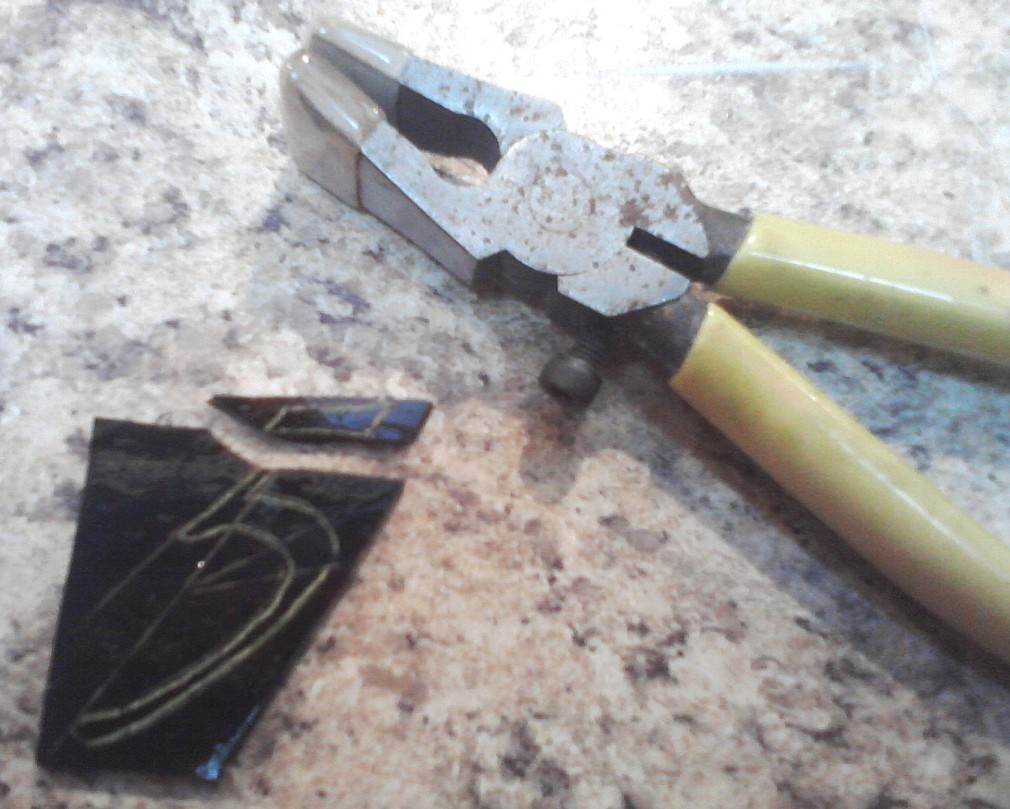
Tools to be used to shape image.
Above are the tools I use to 'cut' out my image from the glass. Left to right:
Running Pliers, Grozier Pliers, Breaking Pliers, Glass Scorer, Wheeled Nippers, Metallic Permanent Marker


Rough break lines scorred in glass.
3. Score the glass.

A.  First score around the entire transferred outline.
B. Next score rough break lines. For this image I made five rough break lines.

How did I decide where to put the rough breaks?
First task was to section off the top of the five. Then section off the upright area connecting the top to the curved bottom. Now the curved bottom needed to be sectioned so the wheeled nippers can get in there and nip away the extra glass. Too large a curve and the glass will want to break straight, not curved! I added score lines to section it into three pieces.

First rough break make using running pliers.
 4. Break glass on rough break lines.

Use the running pliers to break the glass along the rough break lines.

Shown here is the first break. You'll note this is not a perfect system and sometimes the glass just does not break where you scored.  I was lucky and it deviated outside of my image.

Do have extra glass on hand to re-do your image if the glass does not cooperate :/
All rough breaks now made to image.
< Here all five rough break lines are broken using the running pliers.

Tip: As you make each break, put the pieces back down to re-make the image.  It is quite easy to get lost now, especially if you inadvertently turn a piece, or turn over a piece.
Image now completely shaped after use of grozier/breaking piers and wheeled nippers.
5. Finish shaping the image pieces.

Finesse time.
Here I will use the grozier & breaking pliers together and/or the wheeled nippers.  Just depends on the shape. For short straight breaks, use the pliers combo.

For gentle curves use the wheeled nippers. Nip off a small amount at a time until you get to the score line around the image. I have a general rule of thirds- nip off no more than 1/3 of the way to your drawn line at a time.

Do be sure your nippers have fresh cutting edges. Use the little allen key that comes with it to loosen and turn the wheels if the glass takes force to nip.

Cleanup and assembly of glass.
 6. Cleanup and assembly.  I use a bit of ammonia based glass cleaner on a paper towel to clean off the transfer paper line as well as any oil from the scorer or my hands.

And the clear tape is used to hold the pieces together until they can be glued.

Working direct, place tape on the right side of the glass. Align each piece precisely and glue down to your board altogether.

Working indirect, place tape sticky side up on your table and assemble glass on top of tape. Glue down on your board altogether by flipping over onto board so right side is down and tape is now up.
Completed image created in glass.
Got a sign to make? Give this method a try.  You can see some projects I have used this method with.  Click stepping stone here or in my word cloud at right -do be sure to scroll down as a few posts will pop up, including a few where other methods were used.

I make more than just signs! 

I create original design silver jewelry too!! 
https://www.mosaicsmith.com/collections/all   or
https://mosaicsmith.etsy.com

Sunday, July 15, 2012

Part 2 - Reversible Mixed Media Glass on Glass Mosaic

Part one of my discussion of my "Fire and Rain" glass on glass mosaic can be found here: http://blog.mosaicsmith.com/2012/07/reversible-mixed-media-glass-on-glass.html

Both sides of a reversible glass on glass mosaic titled "Fire and Rain" featuring a hibiscus flower.
Both sides of "Fire and Rain"
I should clarify- this mosaic is a bit more than a simple glass on glass project. It is really all about layers and could more properly be described as a glass sandwich where a pane of clear glass is the 'filling' and the 'bread' on each side are two unique, but related, mosaics. In addition, the focal flower on the 'fire' side is mosaiced on an additional layer of curved clear glass for the petal. (This process is the focus of Part 1, linked above.)

This post will focus on the process and design decisions for the 'rain' side mosaic.


The 'fire' side needed an upbeat mood.  Clear, vibrant, colors were chosen for that side and the leaves were oriented in a predominantly upbeat position as well. The grout lines for the sky were deliberately random but piece sizes graduated smaller going toward the horizon to give an expansive feeling to the sky. Brighter blue in the upper sky and blue/purple for the lower were chosen to help lead the eye down, as were the predominantly slanting groutlines in the sky.  Flower stem and leaf center vein lines help lead the eye around to the focal flower.

Detail view of 'rain' side of glass on glass mosaic titled "Fire and Rain" by artist Linda Pieroth Smith
'Fire" side of "Fire and Rain" - detail
But for the 'rain' side, I wanted a more somber mood. Muted colors were key but were carefully chosen so each area was distinct. The central flower is still the focus but construction here was completely different from the 'fire' side.

Textured glass was used where the petals folded from the weight of the rain; very smooth glass for the un-folded portions.

First, the petal shapes were cut in one large piece each, then the petal was scored/broken along vein lines. The pieces, when reassembled and glued in place, had barely any space for grout but enough that a subtly deeper tone of grout defined the vein lines. Click photo for larger view.

Leaf orientation is more somber on this side with their more vertical placement. Stronger emphasis on flower stems both aid in eye movement and contribute to a less-lush feel.

Both sides of glass on glass mosaic titled "Fire and Rain" by Linda Pieroth Smith, as viewed in the sunlight.
Both sides of "Fire and Rain" - viewed in sunlight
When working glass on glass, the importance of light must also be considered. Especially how the opaqueness of glass and grout on each side interact.

So the light would shine through the 'fire' side central flower, all the flower glass chosen was opaque enough to stand alone in dim light situations but translucent enough to let sunlight make the flowers glow.

Leaf and grass glass is all very opaque but the sky glass on both sides transmit light well. Narrow sky grout lines on the 'rain' side give that side a rain effect but, since they are narrow, only add subtle depth to the 'fire' side sky.

Finishing details: Mosaic is set into a wood frame with a black patina and secured with hand crafted solid copper L brackets that have been hammered and also have a black patina. Mosaic title and artist signature are engraved on small copper plates.

"Fire and Rain" has sold.

I create original design silver jewelry too!! 
https://www.mosaicsmith.com/collections/all   or
https://www.etsy.com/shop/MosaicSmith

Wednesday, July 11, 2012

Reversible Mixed Media Glass on Glass Mosaic - Part 1

This series of posts will highlight some of the how-to on the making of my "Fire and Rain" glass on glass reversible mosaic. Below is the finished main flower on the 'Fire' side. Click images to enlarge.
Fire side of "Fire and Rain" glass mosaic window art by Linda Pieroth Smith
Fire side of "Fire and Rain" 9 7/8" x 14 3/8"
The flowers on this side are all made up of individually mosaiced flower petals.

First I cut up a clear glass jar that previously had been used to hold spaghetti sauce. The wide mouth made it easy to use wheeled nippers to get in there to break the glass. Look at the jars in your pantry and you may also see some with interesting curves to the jar glass, especially those with non-vertical sides.  This one had a nice wide curved shoulder area that then sloped down to a highly curved sort of foot area.

Shows five glass shaped flower petals to be used in hibiscus flower mosaic.
Each of those five flower petals above is one large piece of shaped clear glass.
  • Once I had my jar broken into large chunks, I played with their orientation so the curves resembled flower petals.  
  • Then I marked them with a sharpie marker and nipped them into their final shape with my wheeled nippers. 
  • I finished the shaping with my grinder to ensure no sharp edges and to give the edges a 'frost' look.
  • When I was happy with their shape, I used GE Silicone II glue to attach them to a sheet of clear glass as well as to each other.

Next step was to prepare the colored glass for the mini mosaics for the flower petals.

Glass bits being prepared for glass on glass mosaic.

I nipped narrow, about 1/8",  bits from colored glass. My plan was to use these bits cut side up on top of the petals. Then the natural curve they have from the wheeled nippers could be used to follow the curve of the clear glass petals. BUT, people touch mosaics! So, to smooth the sharp edges of all those little bits, I placed them all in a small glass jar, added water 3/4 of the way up and a bit of dish soap and then shook them.  And shook them.  And shook them some more. At least 10 minutes of shaking and they still had a semigloss sheen but no sharp edges.

Work in progress picture of glass on glass hibiscus flower for "Fire and Rain" mosaic by Linda Pieroth Smith
Finally, I could begin mosaicing!

Again, GE Silicone II glue was used to attach the prepared bits to the clear glass petals.

That yellow 'blob' in the center is a cool castoff from a glass blowing shop. It did not make the final mosaic but a similar one was used instead.

Lipstick red grout then completed the flower.  The flower buds on this 'Fire' side of the mosaic were completed the same way.  The green 3D pieces are also glass blowing castoffs.

Mixed media glass on glass mosaic titled "Fire and Rain" by Linda Pieroth Smith
"Fire and Rain"
Next post will be about the 'Rain' side of the mosaic.
Image at left shows both sides of the completed mosaic as it looks against a white background.

Part 2 of discussion of this mosaic can be viewed here: http://blog.mosaicsmith.com/2012/07/part-2-reversible-mixed-media-glass-on.html

"Fire and Rain" has sold.


I create original design silver jewelry too!! 
https://www.mosaicsmith.com/collections/all   or
https://mosaicsmith.etsy.com

Sunday, June 24, 2012

Shading Grout for a Sunset Sky

Glass mosaic clock with shaded grout in the sunset sky area.
Tropics Time
Pendulum Clock
10" x 4.25"


This is a project I completed a few months ago on which I did a grout shading on the sky area using four grout colors.
At the bottom I started with 'Camel' which is kind of rusty orange. Moving up I transitioned to 'Summer Wheat' which is a dusty gold. Next up I used a bit of natural grey and at the top is 'Pearl Grey' which is a blue-grey color.

Before adding these four colors, I grouted the lower 'water' portion in Mallard Green as well as a skinny strip in the center of each of those sky palm fronds. Once the green had cured for a bit- a few hours is enough- I used masking tape to protect it from the sky colors. 

When laying in the sky colors, I started from the bottom and added grout in rows. Where two colors meet, I did a little bit of smooshing to further blend the colors.

When cleaning off the excess grout, it is very important to wipe in the same direction as you used to lay in the grout color, in this case from side to side.  A change of direction during this step will muddy up your color gradient.

To see more posts about grout, click 'grout' in the label cloud => or this link http://blog.mosaicsmith.com/search/label/grout

This clock has sold, but see my other available clocks in my Etsy MosaicSmith shop. https://www.etsy.com/shop/MosaicSmith?search_query=clock

All available mosaic art: https://www.etsy.com/shop/MosaicSmith?search_query=mosaic+art


I make sterling silver jewelry too!!  http://MosaicSmith.com


Tuesday, February 21, 2012

Who Recycled, a Glass Mosaic Owl Portrait


'Who Recycled'
Scroll down to see construction slide-show
I recently completed this 6" x 6" framed glass mosaic for Lin Schorr's Sept 2012 Auction benefiting Doctor's Without Border's.
www.flickr.com/photos/linlee8/6260969290/in/set-721576279...
The frame inspired this piece and was found at a local fundraising sale. It likely was a sample frame for a frame shop.
The owl is from a photo I took of the one who lives at the Florida Aquarium in Tampa. The pose and texture went nicely with the frame.
Continuing the recycled theme, the substrate is from a piece of scrap hardibacker concrete board that otherwise might have been thrown away. The owl glass is all from little scrap bits and the background is nipped from wine bottles.


To see slideshows from other mosaic projects, click 'Slideshow' in label cloud in right margin.

Although the original "Who Recycled" has sold, a print is available on my page at Fine Art America:
http://fineartamerica.com/artists/19+linda+smith

All available mosaic art: https://www.etsy.com/shop/MosaicSmith?search_query=mosaic+art

I make sterling silver jewelry too!!  http://MosaicSmith.com https://mosaicsmith.etsy.com

Monday, January 16, 2012

More Shading Grout in a Mosaic


Revisiting the topic of shading grout in a mosaic. In a previous post I shaded using two grout colors.

For this project, I shaded between four grout colors. The fade from deep black/green to pale green was chosen to enhance the glass shading.

First step was to play with mixes to find the effect I wanted. I used a plastic spoon, leveled off with a wooden stir stick as a measuring device. Stirred well, the dry mix color will be approximately the same as the finished, cured, color.

(Each recipe was written on the cup so it can be duplicated in the future, assuming those grout colors can be obtained. I used the colors black, mallard green, tea green and straw [no, not pear like it says on the cup, oops :] - for those that might have those colors on hand.)


Working from light to dark, I laid in each color. Since my substrate was glass, I marked it off into sections on the reverse using a sharpie marker. You might be able to see that in the first picture- green marks.

Picture on the right shows the grouted project before much 'smooshing' has happened.


In the left picture, you can see the results of careful cleaning. **Note: NO WATER, and no sponge, is used for this cleaning method.

First I removed excess grout. I started from the light end and moved across the piece from side to side just within that color. Then cleaned my tool (my finger!) and moved down a bit and repeated until I removed a lot of the excess from the entire piece.

Still with the grout very wet and soft, I started again at the light end removing a bit more grout but this time made a zig zag line across from side to side. I continued on down toward the dark end in this zigzag manner and this helped to blend each grout section.

At this point, much of the excess grout has been wiped off and I waited a bit for a haze to develop. I then used a soft cloth to remove the haze, again starting from the light end and working across from side to side. I used a clean section of cloth for each pass.

And here is the finished project, a wall clock.


SOLD

I create original design silver jewelry too!! 
https://www.mosaicsmith.com/collections/all   or
https://mosaicsmith.etsy.com

Wednesday, January 11, 2012

Anatomy of a Glass Mosaic Light Switch Cover


Click photos to enlarge.

Well, my way of putting switch plates together..

Choose a sturdy, commercially made, base to attach your mosaic to.  I now use metal bases. I have used wood in the past, but had problems with warping during grouting, especially for the larger sizes (yup, wood and water don't don't play nice together). And I feel the plastic covers have a bit too much flex, at least the ones my sources carry.

Attach your design with your favorite glue- Weldbond, silicone...

Grout! Such a simple, yet critical step.


  • Color choice is key. If you are going to add a resin coat, like I do for all mine, you need to base your selection on the wet grout color. Photo at left shows the cured grout color. Looks kind of blah and washed out this way but, when covered in resin, it will revert back to the beautiful contrasts of the wet grout color.
  • If you use glass for your design, use fine grit sandpaper on all exposed edges before grouting.
  • Use wood toothpick, or similar tool, to gently recess the screw hole and to shape the switch or outlet openings. It's got to fit in its new home!
  • Properly cure the grout before adding resin.

To protect fingers from sharp edges, and to protect grout from finger oils, all my switch plates receive a top coat of a two part resin epoxy. Quite a messy step, and a bit time consuming, but well worth it.
  • Read the directions for the resin carefully before you begin and follow them exactly.
  • Choose all disposable materials for mixing and stirring and be sure you cover your work surface!!
  • Also, be sure to elevate your project so the excess resin has a place to run off onto. I use a cardboard cylinder or large plastic cups.

Final step- for a complete pulled together look, custom color your screws.

I create original design silver jewelry too!! 
https://www.mosaicsmith.com/collections/all   or
https://mosaicsmith.etsy.com

Tuesday, June 21, 2011

Third Set of Nine Mosaic and Poured Concrete Stepping Stones


I have completed nine more poured concrete and glass stepping stones for my yard.

This is a very ongoing task with the goal of creating about 50 to aid in walking around our side and back areas where we have river rock in place of grass.

Click image to enlarge.

The top left lighthouse (St Augustine, FL) is pieced out of glow-in-the dark tile sections for light. The bottom middle is showing the rainbow of six smaller poured concrete bubbles from the tropical fish. Many of these designs are inspired by Florida nature. The right middle is brain coral and that rooster was one we saw living in Key West.


Interested in making some stones yourself?
I did a blog posting a while back with detailed how-to instructions, plus pictures, for making these poured concrete stepping stones- click here to see.

All designs are my own. If you make some stones I hope you use the opportunity to also create your own designs.

I don't just play with concrete!! 

I create original design silver jewelry too!! 
https://www.mosaicsmith.com/collections/all   or
https://mosaicsmith.etsy.com


Friday, January 28, 2011

How To Make Concrete Mosaic Garden Art Ball

You can make very fun garden art using found objects and scrap glass.

This post details how I made the garden ball pictured above, using a glass globe from an old pendant light fixture. You likely don't have one of those handy :) , but a little thinking outside the box and you can come up with other unique 'molds' to make bases for your own personalized garden art.

First- some general supplies:
  • Some sort of 'mold'. Ideas- glass bottles, plastic containers such as milk bottles, takeout food containers... IMPORTANT: If you use a plastic form, you must have an opening wide enough for the cured concrete to be removed through. For milk jugs, cut off the entire top before adding concrete mix. The opening needs to be as wide as the widest part of your shape.
  • concrete mix
  • eye protection!, hammer, prying tools
  • glass nippers
  • scrap stained glass- often local stained glass shops will sell scrap by the pound or ebay and etsy both often will have listings for scrap.
  • thin set mortar
  • grout
Before adding concrete mix, I lightly coated the inside of the shape with a mold release- Vaseline but cooking spray will work in a pinch.

Add concrete mix slowly and tap occasionally (with your hand!) to raise air pockets. Don't want to break that glass yet! If your shape includes thinner sections, you will want to reinforce them with hardware cloth sections embedded in the center. See my stepping stone instructions.

If you use a plastic form, you can unmold, carefully, usually after one day.

If you use glass, WAIT a minimum of 10 days for the concrete to cure before breaking glass. Full cure is at 30 days.


Be sure to wear eye protection when breaking the glass off! I used both the hammer and the knob end of a glass scorer to break the glass in sections. Old dental tools and flat blade screwdrivers worked well to pry off sections.

Now that you have your blank concrete 'canvas', have fun creating!! I used the glass I removed to make the white flowers on my garden ball. They were especially pleasing to work with because the glass was curved and fit nicely back on the ball. I used thin set mortar to attach my glass. This is a weather friendly glue though if you live in a freeze zone, mosaic art lasts longer if brought inside in winter.

For adding flat glass to curved sections, smaller pieces fit around the curves better- and are less hazardous! Use extreme care when handling your piece as there will likely be sharp exposed points and edges. Grouting will minimize this.


I don't just play with concrete!! 

I create original design silver jewelry too!! 
https://www.mosaicsmith.com/collections/all   or
https://mosaicsmith.etsy.com

Saturday, April 24, 2010

Mosaic Journey - Learning How to Mosaic a Pot


Spring time brings with it my desire for gardening and this cold, cold winter (yes, even here in Florida!) had me dreaming of mosaicing garden pots.

I did my first pots last December (as gifts) and this was a bit of new territory for me. I did what I usually do and turned to books and the Internet for some how-to. And wow, lots of variations to be found on prepping the terracotta pot: 1.weldbond/water on outside penetrating sealer on inside 2. weldbond/water on outside yacht varnish on inside 3. house paint inside and out 4. weldbond/water inside and out...

I decided to go with variation #2 and to use thin set mortar to attach the ceramic pieces to the pot.

I painted the inside of my terracotta pot with spar varnish. This would seal the interior and prevent water from penetrating and soaking through to the mosaic which would compromise the mosaic's thin set mortar bond to the pot.

The outside of the pot I painted with a mixture of five parts water/one part weldbond glue. This soaked into the terracotta. I chose this method of sealing because it would reduce the water absorption from the thin set mortar. Unsealed terracotta is so porous that it will absorb water from thin set quickly, which weakens the thin set. I also suspect that the weldbond softens a bit from the thin set moisture and then bonds with the thin set resulting in a stronger bond of the mosaic to the pot.

Why thin set mortar? Another common choice would be weldbond. But, I know from experience (glass on glass project) that if moisture gets down to the weldbond- and we are talking about an outdoor pot here! -that the weldbond will go soft and white again. Additionally the weldbond is best for attaching flat surface to flat surface. A silicone type glue would work but I feel the thin set attaches more firmly to porous surfaces. Thin set also excels at bonding irregular tesserae (mugs!) to curved surfaces.

So many choices on what to use to create the mosaic design with. I decided to go with broken plates. (In my location I do not need to worry about freeze/thaw but if you do, look for hardier choices or bring your garden pot inside for the winter.) So I checked my local thrift stores for goodies and also etsy.

These lovely mugs came from ceramic artist Judy B Freeman.


Many ceramic artists on etsy will occasionally offer for sale a box of broken rejects specifically for mosaic use.


To the left you can see that I used thin set under the top brim to even out the surface. And you can see more of Judy's awesome butterflies.

After attaching the design with thin set, I grouted the mosaic as usual (use caution with the ceramic edges- SHARP!) and applied a sealer after the grout cured for three days.

And below are three views of another pot also made with Judy's butterfly mugs as a design inspiration.


I create original design silver jewelry too!! 
https://www.mosaicsmith.com/collections/all   or
https://mosaicsmith.etsy.com

Friday, April 16, 2010

Thoughts on how to choose a grout color, or colors

What color(s) to grout a mosaic is a common dilemma. And a personal decision each artist needs to make based on their vision for the finished piece. This post is just some of my thoughts and by no means comprehensive.

I have a general rule that often helps me make the choice: blend the background, fracture the focal.


But, I break this rule regularly. Usually on realistic pieces when I feel that all the careful shading I have done on a focal will be lost if I choose a grout color that breaks it all apart.

That was the case with this little mosaic I did recently:
"My Shadow" (Print available)
I even briefly considered skipping the grout on the kitty herself but rejected that since I could see the substrate through the spaces. Additionally, my glue was weldbond which I don't feel would be lasting in Florida humidity if not protected by grout. As an aside- I am looking into smalti as this material is not traditionally grouted.

So, for kitty herself I actually used three colors of grout. Tea green for the irises, black for the nose and right eye pupil, and a natural grey for the fur areas. The natural grey is in between in tone to the light and dark fur tones and provided subtle contrast so she is still clearly mosaic but the pieces blend.

For the background of kitty, first decision was glass color and flow. I chose the pink as a compliment to her eyes and to emphasis that this sweet kitty is a she. The squares are a contrast to the irregular pieces used in the fur. Because of the blending of kitty with her grout, I felt I needed a grout color in the background that did not completely blend but that provided a very subtle contrast as well. Warm grey was my choice here.


To help with my decisions, there are a couple things I do.

First, I keep a box full of little cups and their wood stirrers that I have used previously to mix up grout. I label both the cups and sticks and use them to do a squint test.
Second, I will sometimes sprinkle a small amount of dry grout in an area to test the effect. The color of the dry powdered grout is about the same as cured grout in a finished project. You just have to remember to use safety precautions as you do not want to in-hail any of the grout powder!


There are a couple of online resources that can help to visualize different grout effects too:

Mosaic Mercantile, http://www.mosaicmercantile.com , has the grouterizer.
Choose the mix of color tiles similar to your mosaic, 16 choices, then choose from ten grout colors to see their effects.

http://www.thejoyofshards.co.uk has a Grout Colour Simulator.
This one has seven different mosaic choices including a variety of different mosaic types. Then choose from 20 different grout colors including black to white shading in four different directions, fun!

~~~~~~~

"My Shadow" is in my private collection but a print is available on my page at Fine Art America:

I create original design silver jewelry too!! 
https://www.mosaicsmith.com/collections/all   or
https://mosaicsmith.etsy.com

Saturday, January 30, 2010

Miss Dolphin and a mosaic lesson learned

Going back in time a bit here to a project I completed, with the help of my then 10 yr old daughter's design, in October 2009. There are a few WIP pictures on flickr as well.

Miss Dolphin: Click image to view larger:

For this project we spent the summer collecting beads and whatnot's here and there in our travels, and online, particularly in red and white for the shirt.

I made the fortunate decision to grout the sections in different colors and to start with the white stripes. Usually I will tape off the sections before grouting but due to the crazy texture of the striped shirt I decided that I'd just go slow and tidy the edges using a toothpick after. Really glad on this choice because the slop of sanded grout on one particular type of red square bead scrubbed the color off those beads, yikes!! The project was salvaged with a short delay while I sought out replacements in a similar size and color.

Here are the offending beads after removal from the project:
I had to replace one purple bead as well in the beach ball during the grouting process. Not sure which store the problem beads were purchased from. Because of the quantity I have, I think it was a chain big-box store rather than a smaller bead store.

The Lesson- TEST your materials before use. Another mosaic blogger, TileMosaicGirl, had a similar experience with red glass gems and blogged about it here: photo slideshow and her experiment. She tested the materials both by scrubbing with grout and with sandpaper. She found that the sandpaper method was quite effective to test if the color would withstand grouting so in the future I plan to also test my materials this way.

Tuesday, May 19, 2009

First Nine Poured Concrete Stepping Stones

Here are the first nine poured concrete stepping stones in my very ongoing project to make pathways around our yard. But, yay!, I am keeping all these, lol.


Wondering how to make stepping stones like this for your yard? I blogged about the how-to here:
http://blog.mosaicsmith.com/2009/03/how-to-make-poured-concrete-stepping.html 

All designs are my own. If you make some stones I hope you use the opportunity to also create your own designs.
~~~~~~~

I don't just play with concrete, I make original design silver jewelry too!! 

https://mosaicsmith.etsy.com

 https://www.MosaicSmith.com


Sunday, March 22, 2009

How to Make a Poured Concrete Stepping Stone

Half of our yard is covered in river rock. Not easy to walk on. I've decided the solution is MANY stepping stones- guessing about 50. I could just buy a bunch at the home center, but what fun is that?? Instead I'm making poured concrete stepping stones with a different mosaic design in each. I have a few already made and thought I'd share the process I've been using. You can make these mosaics as simple or as detailed as you desire. I'm planning on using up a whole lot of bits and veering toward the simple end.

Some supplies you'll need or just find handy:

  • Portland cement type I
  • Sand
  • Dish pan (dedicated) for mixing in
  • Some sort of trowel or small hoe as a mixing tool
  • Some sort of disposable, or never to be used again for food, cup for scooping sand and cement.
  • Clean water for mixing (or admix of some type if you live in a frost zone- read labels at your home center to find an appropriate admix).
  • Disposable dust mask. Very important to wear this while working with the dry cement!!
  • Hardware cloth
  • Wire cutters or similar for cutting hardware cloth
  • Gloves- heavy duty for use when cutting hardware cloth and vinyl disposable for when mixing concrete.
  • Mold. For this project I use a 14" diameter commercially made stepping stone form.
  • Clear contact paper
  • Some sort of tesserrae for piecing a mosaic design. I use stained glass frequently.
  • Mold release of some sort. I use petroleum jelly- cheap and easy to find.
  • Newspapers for work area
  • Plastic to cover concrete after unmolding.
  • Sturdy board larger than the mold to use when flipping the mold in step 6.

***In addition to the instructions below, please also see the comments below this post!


1. The mosaic design is pieced in reverse on the contact paper. Place the mold on the paper side and trace it then cut the shape out 1/4" inside the line so it will fit inside the mold. You can sketch out a design on the paper portion. Peel off paper, and place sticky side up on your work surface with the design underneath. Remember to reverse words/letters/numbers so they are mirror image while piecing.


2. Figure out how much sand and Portland cement you need. For this project I use recipe #3 in the book Making Concrete Garden Ornaments by Sherri Warner Hunter. One great tip, among many, from this book is to fill your mold with sand and measure the volume. This will be how much you use for the project and 1/3 of this volume is how much Portland cement you will need. Use approximately half as much water/admix as cement by volume. I have a wonderful old clear plastic pitcher with very straight sides that I have marked this ratio on for each mold size I use.


3. Smear a thin coating of petroleum jelly on the inside of the mold. Place the contact paper/pieced design into the bottom of the mold with the pieced design sticky side up. Use the wire cutters to cut a circle of hardware cloth about 2" less in diameter than your mold (one inch smaller each side).


4. Add the sand to your plastic bin. Put on your mask and measure out the Portland cement and add it to the sand. Stir in well and slowly add in water/admix in increments. Be real careful that you do not add too much liquid. I aim for a very soft cookie dough consistency. Not crumbly but never runny.


5. Go slowly adding the cement mix to your mold. You need to press the concrete into all your spaces but carefully so you do not dislodge your pieces from the contact paper. Fill the mold half way then place in the hardware cloth piece. Raise slightly and tap the mold down to the ground repeatedly to raise any air bubbles. Fill the mold the rest of the way and repeat the tapping to again remove air bubbles. Smooth the surface. Clean up plastic pan and tools OUTSIDE. Cement/concrete washed down a drain will harden in the drain!


6. The filled mold needs to sit undisturbed until the surface is firm and no indent is made when touched. I found the amount of time this takes depends very much on the air temperature. In the summer here (90's day 70's night) it required only six hours but in our current temps (70's day, 50's night) it takes 12 hours. When firm enough, gently pull mold away from sides very slightly. Place a stiff board (I use a leftover large floor tile) on the stepping stone surface and carefully flip the board and the mold. Slowly pull the mold straight up to remove. Remove the contact paper slowly. The surface can be gently cleaned using a paper towel or a piece of newspaper. ****If you have small air pockets visible and would like to fill them in, mix together a slurry of just Portland cement and water. You can then use this to fill in the divots. Work a very small area at a time!! Cover in plastic and leave undisturbed for at least three days. After seven days it will be cured enough for walking on and the color will lighten to about its final color.


Interested to see what else I've done with stepping stones? Click here to go to all posts tagged with 'stepping stone'. All designs are my own. If you make some stones I hope you use the opportunity to also create your own designs. Have fun!

~~~~~~~

I don't just play with concrete!! 


I create original design silver jewelry too!! 
https://www.mosaicsmith.com/collections/all   or
https://www.etsy.com/shop/MosaicSmith