 |
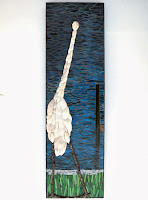
| "Whatcha Doing?" |
I used sections of this Moon shell to shape the bird's head.
The eyes were tricky. I used a small spiral shell for the left and a barnacle on the right. (Click the photos to view large images.)
Then I glued tiny black polished stones in for the eyeball.
The beak is a section of an Oyster shell.
Turns out Olive shells were perfect for the neck feathers. Really. I managed to cut multiple strips from each one. Carefully- shells get HOT when you cut them!
Check out all the dust! If you try this, working outside is recommended, in addition to wearing a mask.
Neck feathers. Check. Now I needed body feathers. This Whelk shell, cut into wedges, worked nicely for many of them.
For the wings, I used a variety of Clam type shells.
The tail feathers are pieces of Sand Dollar and the inside of a couple sections of large Scallop shells.
Those are two whole Olive shells at the tops of the legs. And lines of tiny Mussel shells for the legs and feet.
Note: I've been filling in the background concurrently with figuring out the piecing of the bird. And in this photo I have grouted the background in white. Looks awful, as I expected. That is NOT the intended finished look!!
 It is actually a bit of an experiment. I have noticed that sometimes
dark grout takes the 'light' out of a mosaic and thought if I filled the
grout spaces most of the way with a light grout, that the light-robbing
effect would be diminished. I sponged the wet white grout to remove
enough from the spaces that there would be room for a dark top-coat of
grout.
It is actually a bit of an experiment. I have noticed that sometimes
dark grout takes the 'light' out of a mosaic and thought if I filled the
grout spaces most of the way with a light grout, that the light-robbing
effect would be diminished. I sponged the wet white grout to remove
enough from the spaces that there would be room for a dark top-coat of
grout.I mixed up black, pearl grey and 50:50 black/grey grout and added Weldbond glue to each mix for extra stickiness. Using it in a bag with the corner cut off makes it very easy to apply, especially as a top coat.
MUCH better color now with the top coat added. Black in the upper portion, grey in the lightest blue area and the mix for the rest.
The grass area got mallard green grout in the same way.
(The grey stone area was glued in with black tinted thin-set and was not grouted.)
Experiment results: The grass area was done with similar glass and in a similar strip pattern to one I have used before. I do think the look is brighter in this mosaic because of the white grout/top coat method. I don't see as much extra brightness to the water area. I think because the greens for the grass might have been a more translucent glass than the water blues. So, when using glass that has some translucency and dark finish grout, I will use this white grout/top coat method in the future.
I create original design silver jewelry too!!
https://www.mosaicsmith.com/collections/all or
https://www.etsy.com/shop/MosaicSmith


No comments:
Post a Comment